

Diy Refinishing Table Dark Top White Base
Painting a kitchen table is an easy project! As long as you lot follow the steps, yous'll have a paint chore that lasts for years to come!
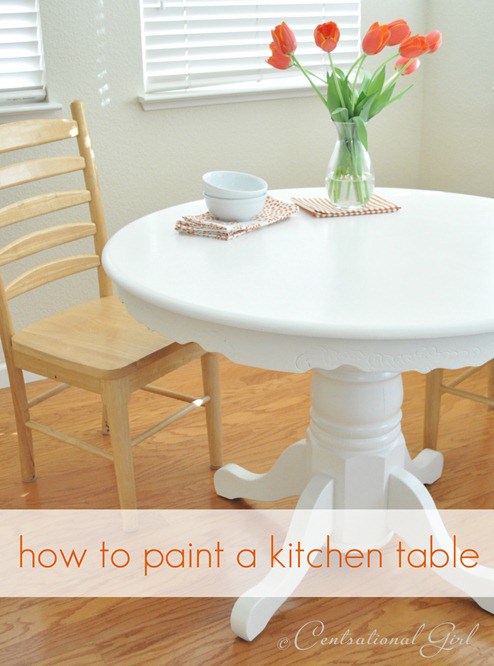
Today's DIY project is about how to paint a kitchen table. I've been painting furniture and cabinets for years, merely this time I tackled the painting of a kitchen tabular array. A kitchen tabular array is the 1 surface that will become the about traffic of whatever piece of furniture in your home, and since information technology gets the near abuse it must be extremely durable.
Painting a kitchen table tin be done with success when y'all accept 3 things working together – a primer that blocks stains and too sticks like super gum, an extremely durable paint with a difficult stop that tin can withstand the banging of bowls and plates, and finally, a layer of protectant. Permit's get started.
How to Pigment a Kitchen Table:
Offset, take a expect at this pedestal table I found at a thrift store: worn out oak coated with enough of ick and yuck on the surface. Non pretty.

This thrift store notice cost me $45, a good bargain for this solid wood classically shaped pedestal. My friend needed a tabular array for her breakfast nook so when I found this one, I decided to refinish it for her.
What you'll need to paint your own wood kitchen tabular array: orbital sander, medium dust sanding discs, foam roller, loftier quality angled paintbrush, medium form sanding wedge, respirator, bonding/stain blocking primer, enamel based paint, cotton wool rags, clear paste wax.
Step Ane: Yous want to sand off any droppings and some of the varnish and that'south why an orbital comes in very handy – use medium dust discs. Doing it past mitt is possible, merely improve to let this tool do most of the work for you lot.
You don't need to get rid of all the varnish, the primer (side by side step) will cling to the surface, varnish or not. You just want information technology to be smoooooooooth. Use your hand and closed eyes equally your guide, if you tin can run your manus over the surface and information technology feels smooth to the touch, you're good.

Step 2: wipe it all down and start the priming phase. There are several kinds of primers on the market and a lot of them land they work on glossy surfaces. Not all of them are stain blockers though so carefully read the label. The one that has always worked all-time for me is Zinsser – I've used it for years – their Cover Stain sticks like super mucilage and blocks any woods stain from coming through, and likewise dries in an hr. It's oil based, and not available in some States, but in my opinion it's the best.

On near furniture the spray version is just fine, but on high traffic horizontal surfaces like tabletops, coffee tables, or bookshelves, I recommend the roll on/brush on formula – it's thicker and more durable for that reason. Coil on two yes ii coats for the tabletop (assuasive to fully dry in between coats).
For more tips, see as well: How To Pigment Article of furniture
Coil on one coat to the remaining surfaces, wherever the roller tin hands achieve.

Follow up with the spray version to quickly fill in the crevices.

Allow the primer to fully dry for a full 24-hour interval.
Step Three: utilize the medium grit sanding wedge to knock downwards any unevenness from the roller on the primed surface. (The orbital is a picayune as well strong fifty-fifty with a fine grit disc for this phase and doing this by hand doesn't take long.)

Simply be sure to clothing one of these while you do it.

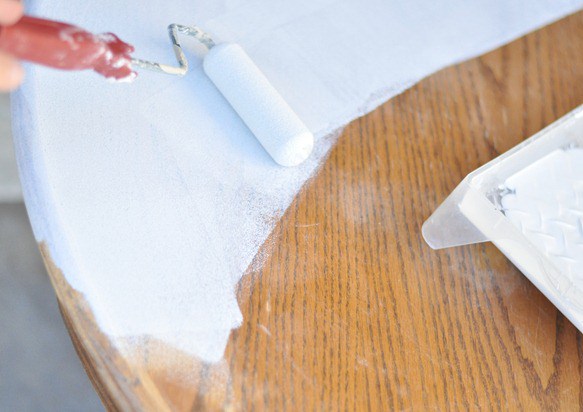
Once you've wiped downwards your primed tabletop, once more run your hand over it to brand sure you lot have a completely polish surface. At present it's time to paint! This is where it's important to buy the right paint. I prefer these enamel paints and I've used enamel paints by Benjamin Moore and Sherwin Williams (Pro Archetype) for furniture. Both have really fantastic water based enamel alkyd formulas – they will requite you a very difficult end like y'all'd go with oil based paints.
For this table, I'm using the Ben Moore Advance water based enamel alkyd in 'Swiss Coffee'. Also a Purdy brush, they're the all-time!

Pace Four: Time to paint! I adopt to work with paint in temperatures between 55 and 70 degrees, not too hot or too common cold, I discover information technology helps with the open time, giving you sufficient fourth dimension to apply the paint without whatsoever elevate. Utilise two thin coats, simply enough to comprehend, allowing to dry between coats (usually 24 hours). If y'all cull a dark colored paint (say blackness, navy, or dark gray) you'll likely need three thin coats of the enamel pigment.
Now here'south the hard function – it takes iii to 5 days for the paint to cure so that it'southward sufficiently hard, so subsequently your final glaze of paint do what it says and wait wait expect! This is a tabletop and you lot need it to be fully cured before yous use information technology to forestall damage to all of your difficult work.
Step 5: Protect your hard piece of work. After a few days it'southward fourth dimension to protect it and you have several options. I like the Brush on and Wipe On water based Varathane, and you tin also employ Minwax Polycrylic (I mention that method hither) merely for white painted article of furniture, I'm really loving waxes. They will give you a soft hand rubbed cease and won't change the colour of your white pigment.
There are various paste waxes on the market, you want 1 that's clear, here are three I normally use merely you can also use Fiddes & Sons, Minwax, and Hannant's every bit well. With this table, I used the articulate Briwax.

Apply a small-scale amount and rub in circles with a clean soft cotton fiber cloth for a thin even coating and let information technology to dry for at least an hr. Buff (wipe repeatedly with clean cotton textile in circles) to a shine, then repeat this step ii more times over the form of a day. Make certain to buff it completely so your wax isn't sticky, and you get a nice matte cease.

You want your surface to repel liquids and stains, so a few layers of wax will help practise that. Later y'all've buffed your last coat, your table is safe for use. Notwithstanding I advise you to take information technology easy for the first few days using it, the pigment and wax are mostly cured merely will exist much more solid after another week has passed.
Here's the tabletop upwards close earlier and after the makeover. From dirty and spotty to fresh and fabulous!

So those are the steps on how to pigment a kitchen table. Take to get a beautiful result that will last for years to come.

Before: 
After:
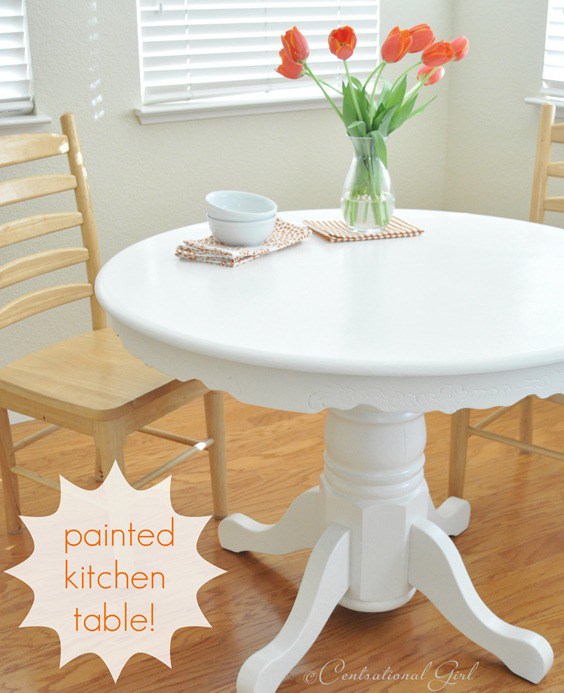
It looks and so fantastic! Amazing what paint tin do, right?
…
.
.
Source: https://centsationalstyle.com/2012/03/painting-a-kitchen-table/
0 Response to "Diy Refinishing Table Dark Top White Base"
Post a Comment